Why run stable diffusion in Google Cloud?
- It’s very cheap as long as you shut it down when you’re not using it.
- You can load whatever models you want.
- You can automate the process of starting your server, loading models, generating your images, and shutting down.
How Cheap is it?
$0.14 / hour for the cheapest configuration, which is the configuration I’ve been using. It is fast enough, and can generate a 512x512 image in less than 3 seconds.
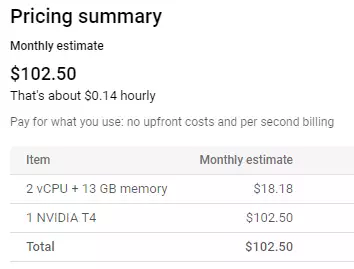
The only price you need to look at is the hourly price, assuming you plan to shut down your server everytime.
Here is what the most expensive option will run you, with a massive A100 80GB GPU:
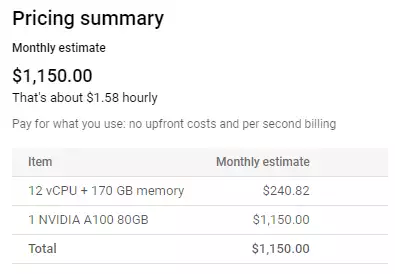
Still very reasonable.
This is using Spot Provisioning, which is about half the price of Standard Provisioning. The catch is that they can shut down your server at any time if they need resources for something else. More on this later.
Getting Started
Sign up for Google Cloud if you haven’t already, and add your payment method.
The UI in Google Cloud can be very overwhelming, but the easiest way to find specific pages is to use the search bar at the top. In this guide, when I say “Go to this page”, just type the page name into the search and choose the matching product page.
Increase GPU Quota
First, you need to increase your quota for GPUs, since the default is 0.
Go to the All Quotas page, and use the filter to find the GPUs (all regions) quota:
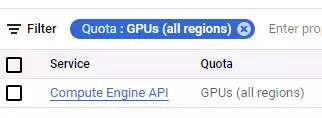
Edit this quota so the limit is at least 1. The request will need to be approved, so don’t try anything too high.
Setup Firewall
Go to the Firewall (VPC Network) page.
Edit the default-allow-http rule, and add the 7860 port to the TCP protocol:
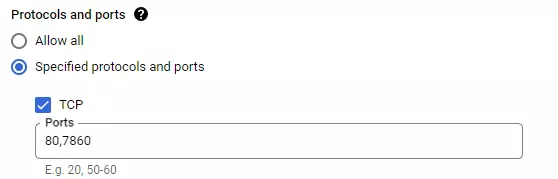
Alternatively, you could create a new firewall rule instead of using the default rule.
Create VM Instance
Go to the VM Instances (Compute Engine) page, and click Create instance.
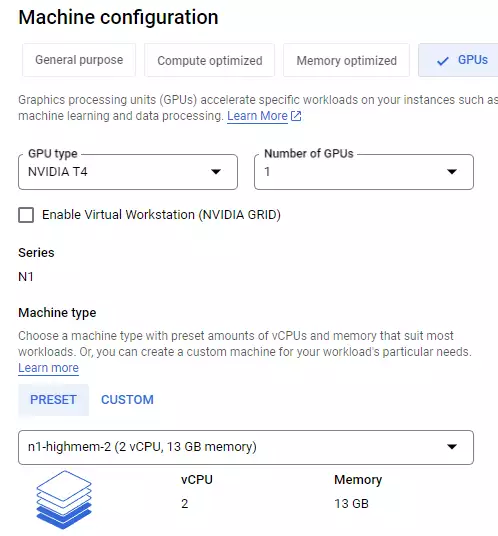
Change the Machine Configuration to GPUs, and select your video card and CPU configuration. NVIDIA T4 is the cheapest GPU and n1-highmem-2 is the cheapest CPU you should choose:
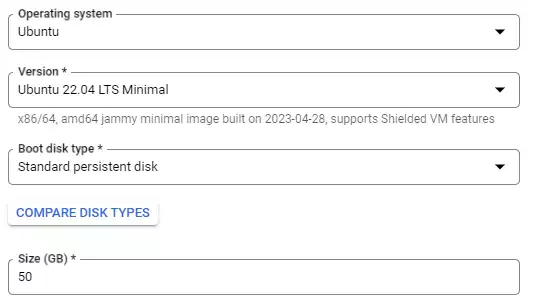
Under Boot Disk, hit the Change button.
Choose Ubuntu for the operating system.
Choose 22.04 LTS Minimal (x86/64) for the version.
Choose Standard Persistent Disk for the cheapest option (or balanced for faster performance).
Choose the size of the disk. You can get by with 30GB if you only want to use the standard model. But if you want to download different models, they are around 2GB a piece, so I choose 100GB to have room to grow.
At the end, hit the Select button to close the dialog.
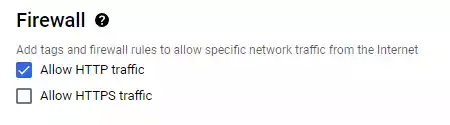
Under Firewall, choose Allow HTTP traffic
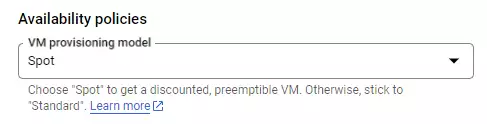
Under Advanced -> Management -> VM Provisioning Model, choose either Spot or Standard provisioning. (Spot is cheaper).
Finally, hit the Create button to create the VM
Setup your instance
Once your VM is started, click on the SSH button.
Install some basics:
sudo apt-get update
sudo apt -y install wget git python3
Install GPU Driver:
curl https://raw.githubusercontent.com/GoogleCloudPlatform/compute-gpu-installation/main/linux/install_gpu_driver.py --output install_gpu_driver.py
sudo python3 install_gpu_driver.py
Install CUDA (Nvidia GPU Software):
wget https://developer.download.nvidia.com/compute/cuda/repos/ubuntu2204/x86_64/cuda-keyring_1.0-1_all.deb
sudo dpkg -i cuda-keyring_1.0-1_all.deb
sudo apt-get update
sudo apt-get -y install cuda
Install a few more things:
sudo apt -y install python3-venv python3-pip
sudo apt-get install -y python3-opencv
Download the Automatic1111 repo:
git clone https://github.com/AUTOMATIC1111/stable-diffusion-webui.git
Running Automatic1111
From your home directory, simple run:
stable-diffusion-webui/webui.sh --listen --xformers --api
To get to the Automatic1111 app, you will need to find the External IP Address of the server. First, find your instance on the VM Instances page. Then either:
- Go to the More Menu and click on View Network Details.
- OR Add the External IP column to the instances table
Go to your browser, and enter your IP Address with the 7860 port: http://YOUR_IP:7860 and you should see the Automatic1111 UI!
Automatic Startup
If you want to Automatic1111 to startup automatically when your server starts, you can add it to your cron file:
sudo apt-get install nano cron
crontab -e
Add the following to the end of the file that opens in nano:
@reboot ~/stable-diffusion-webui/webui.sh --listen --xformers --api
Save the file, and it should start up automatically the next time you start your server
Starting and Stopping the VM
You can start and stop your VM in the More Menu in the VM Instances page.
You cannot suspend GPU instances; you have to fully shut down every time.
Spot Provisioning
As I mentioned above, Spot provisioning gives Google the right to shut down your server if they need resources for something else. For me, the lower price is worth this annoyance of this happening every once-in-a-while.
Here are some tips to avoid getting shutdown:
Run your server during non-business hours. For example, if you create your instance in your region, run your server at night or on weekends.
Create instances in multiple regions. Create another instance in a region on the other side of the globe. That way you can run that instance during the day (when it is night in your server’s region). Note that the requests will take longer in a distant region.
Creating an image
If you are happy with your setup, and want to create more VM instances, you can save yourself a lot of setup by creating an Image.
- Go to the Images (Compute Engine) page
- Click Create Image
- For Source Disk, select the disk of your existing instance
- For Location, select regional (the location is just where it is stored)
- Click “Create”
Now when you want to create a new instance, you can go to your image, and click Create Instance. The instance will be already setup to run Automatic1111 Stable Diffusion!
The Automatic1111 API
If you want to build your own UI, or run bulk generating of images, the API is very helpful. Because we added the --api parameter when we started Automatic1111, the api will be enabled.
You can access the API at: HOST:7860/sdapi/v1/txt2img